Since video content is a booming business on the Internet, HTML and JavaScript are crucial parts of video managing, and they play a large role in user experience. Therefore, it’s important to learn the basics of HTML and JavaScript, and put out successful and accessible video content online. Then, you must learn the three basic aspects of video management, as you keep in mind HTML and JavaScript.
HTML
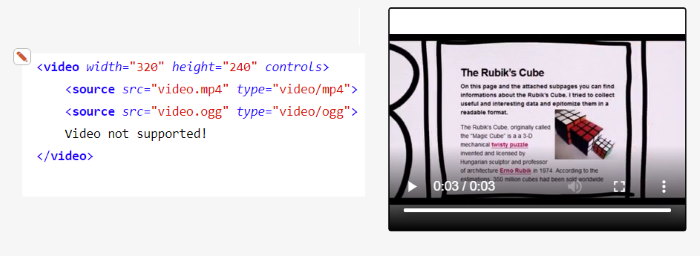
HTML is the easiest way to include video on your pages. Just use the <video> element, and you can embed a video. Here are the most useful <video> attributes:
- [controls] is a basic control bar that has buttons for playback, volume, and a progress bar. You can also control settings for media download, full-screen, and picture-in-picture.
- [autoplay] begins playback while the rest of your page loads (not ideal for iOS; and browsers like Chrome 70.0 will need the [mute] attribute for autoplay to work).
- [loop] is your attribute for playbacks.
- [muted] is when media has no sound by default, and it has a default value of “false.” Therefore, set it to “true” to apply [muted].
- [poster] displays an image (i.e. an ad) before playback starts. It won’t show if [autoplay] is there.
- [preload] is used for buffering media. [none] is for no buffering, [auto] for buffering on site load, and [metadata] for buffering metadata only.
- [height] and [width] lets you define video height and width without using CSS.
An alternative to <video> is <iframe> which embeds video from external sources (i.e. YouTube or Vimeo). Use <iframe> to embed external HTML pages into your page. However, use <video> to customize your video.
JavaScript (JS)
JavaScript works well with <video> since it lets you return information from video methods, events, and properties through the Document Object Model (DOM), which acts as the interface between your HTML and JS functions.
First, familiarize yourself with the HTMLMediaElement API, which lets you programmatically control and monitor video players; and, it’s supported by all browsers.
When creating scripts for managing your video content, use the following open-source audio/video tools:
- jPlayer, a jQuery plugin with comprehensive API, includes multi-codec and cross-platform support.
- js is a media framework that supports media files, streaming content, and embedded players, making it a standalone library or via plug-ins.
Tips On Video Management
To customize your video content, and improve user experience and site performance, follow these three basic aspects on video management:
- Responsive Sizing: Responsive media (videos or images) adjust to a user device’s size and format, meaning that it should automatically adjust when a screen or rotated.
So, when making videos responsive, they should maintain their aspect ratio, regardless of how height and width are defined (4:3 is standard, 16:9 is HD, and 1:1 is for Instagram). Any additional space will be filled with a solid background color by default.
Outside the <video> tag, CSS is used to set the [width] to 100%, and [height] to [auto], to expand your video to the maximum available size. Otherwise, use [max-width] to display your video at a specific size, but scale down when necessary.
Use [iframe], and then a wrapper with a set aspect ratio (or use JS and jQuery), to adjust height and width.
- Text Tracks: Text tracks are used to increase video accessibility. These tracks are added on top of video files using WebVTT files and <track>. While WebVTT files define the text to be displayed and include metadata (i.e. timing, styling, and positioning), <track> defines .vtt file sources and informs browsers of the track type.
Here are the most commonly included tracks:
- Subtitles are text translations of dialog into another language.
- Captions are transcriptions of dialog or sounds for the hearing-impaired.
- Timed descriptions are text spoken aloud for the visually-impaired.
- Formatting: Video format determines whether or not your content is playable on a user’s device. Therefore, always have a preferred format and (at least) one fallback format.
In addition, your first video <source> elements will be the default. Any other <source> elements that follow are fallback formats. Your user’s browser will go from top to bottom through sources until it finds one that’s supported.
Conclusion
 As you keep in mind HTML and JavaScript, and remember the three basics on video management, you’ll be able to better optimize your videos, and ensure a positive experience for your users.
If you don’t want to struggle with videos you can upload them to Youtube and embed them. The platform of the World’s largest online video platform will provide a compatible solution with any web browser.
Michael Dehoyos writes and edits at Academic Brits and Origin Writings. As a web developer, he helps companies improve their marketing strategies and concepts.